Windows 7 Guest In Parallels 12 Not Using Host VPN DNS Servers
# January 11, 2017
There seems to be a glitch with the virtual machine not getting the proper settings from the network even when all of the settings are configured on the host and in Parallels. If you follow these steps below it should get you up and running.
- Log in to the virtual machine.
-
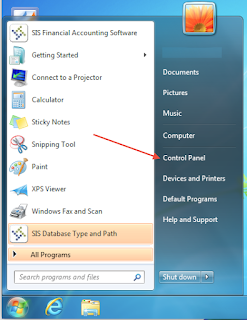
Click the Windows button in the lower left of the screen.
[](https://3.bp.blogspot.com/-qWW8O1548Z4/WHV3GS4C_8I/AAAAAAAAfiA/hBzsEJVlrhY1OzhxtgXgyd78atpQtVtegCEw/s1600/step%2B2.png)
-
Click Control Panel in the Start Menu.
[](https://4.bp.blogspot.com/-CbtSV7x0-SM/WHV3yQ7B6pI/AAAAAAAAfiI/eRbi8hgB6qsaz5apu-0XoTiUUoxp1RtsgCEw/s1600/step%2B3.png)
-
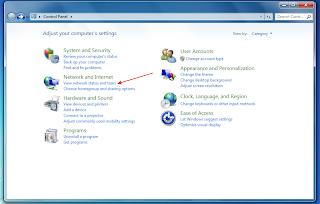
Click View network status and tasks located under the Network and Internet section.
[](https://3.bp.blogspot.com/-UTsXd2nL5aw/WHV3ypevMJI/AAAAAAAAfiI/BkHSATfLZ18cA_4_3pqZUuvGMfMBoHlbQCEw/s1600/step%2B4.png)
-
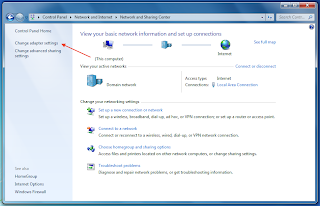
Click Change adapter settings in the sidebar.
[](https://4.bp.blogspot.com/-4JaBjT2zteM/WHV3yookVUI/AAAAAAAAfiI/8d6p3dwyTqsnJwIHhbS1_VZw__k3z14dACEw/s1600/step%2B5.png)
-
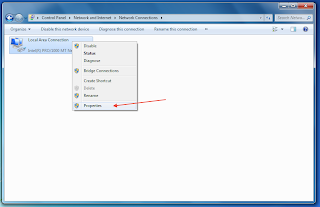
Right click on the Local Area Network adapter and choose Properties.
[](https://2.bp.blogspot.com/-2k5XAzhoAUs/WHV3zt6B6xI/AAAAAAAAfiI/WGtETSXWJUMpAoHFaptsdKLStqrcT0x-QCEw/s1600/step%2B6.png)
-
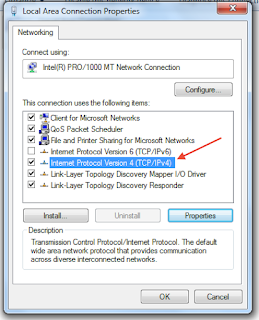
Select the Internet Protocol Version 4 (TCP/IPv4) item and then click the Properties button.
[](https://3.bp.blogspot.com/-wnRSgU54iuY/WHV3zqGoYuI/AAAAAAAAfiI/opub7QHkbZgd1uObQ2r5v5w2YLKw8yadgCEw/s1600/step%2B7.png)
-
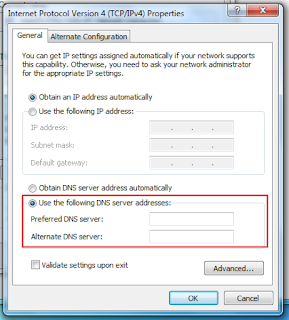
Select Use the following DNS server addresses and enter the IP addresses of your desired DNS servers here.
[](https://2.bp.blogspot.com/-Erx21vX0PCo/WHV3zzSx2II/AAAAAAAAfiI/TPddxVwjcSwRDmyovwpdmvpD7TPABzOKQCEw/s1600/step%2B8.png)
- You shouldn’t need to, but you can restart the VM for safe measure.
There seems to be a glitch with the virtual machine not getting the proper settings from the network even when all of the settings are configured on the host and in Parallels. If you follow these steps below it should get you up and running.
- Log in to the virtual machine.
-
Click the Windows button in the lower left of the screen.
[](https://3.bp.blogspot.com/-qWW8O1548Z4/WHV3GS4C_8I/AAAAAAAAfiA/hBzsEJVlrhY1OzhxtgXgyd78atpQtVtegCEw/s1600/step%2B2.png) -
Click Control Panel in the Start Menu.
[](https://4.bp.blogspot.com/-CbtSV7x0-SM/WHV3yQ7B6pI/AAAAAAAAfiI/eRbi8hgB6qsaz5apu-0XoTiUUoxp1RtsgCEw/s1600/step%2B3.png) -
Click View network status and tasks located under the Network and Internet section.
[](https://3.bp.blogspot.com/-UTsXd2nL5aw/WHV3ypevMJI/AAAAAAAAfiI/BkHSATfLZ18cA_4_3pqZUuvGMfMBoHlbQCEw/s1600/step%2B4.png) -
Click Change adapter settings in the sidebar.
[](https://4.bp.blogspot.com/-4JaBjT2zteM/WHV3yookVUI/AAAAAAAAfiI/8d6p3dwyTqsnJwIHhbS1_VZw__k3z14dACEw/s1600/step%2B5.png) -
Right click on the Local Area Network adapter and choose Properties.
[](https://2.bp.blogspot.com/-2k5XAzhoAUs/WHV3zt6B6xI/AAAAAAAAfiI/WGtETSXWJUMpAoHFaptsdKLStqrcT0x-QCEw/s1600/step%2B6.png) -
Select the Internet Protocol Version 4 (TCP/IPv4) item and then click the Properties button.
[](https://3.bp.blogspot.com/-wnRSgU54iuY/WHV3zqGoYuI/AAAAAAAAfiI/opub7QHkbZgd1uObQ2r5v5w2YLKw8yadgCEw/s1600/step%2B7.png) -
Select Use the following DNS server addresses and enter the IP addresses of your desired DNS servers here.
[](https://2.bp.blogspot.com/-Erx21vX0PCo/WHV3zzSx2II/AAAAAAAAfiI/TPddxVwjcSwRDmyovwpdmvpD7TPABzOKQCEw/s1600/step%2B8.png) - You shouldn’t need to, but you can restart the VM for safe measure.